If you are planning to construct a new building in a radon-prone area then it is essential to take some precautionary measures. Here are some verified techniques that can help to build a radon-proof building. You can also verify it by performing a radon test.
Best Techniques
Quick Navigation
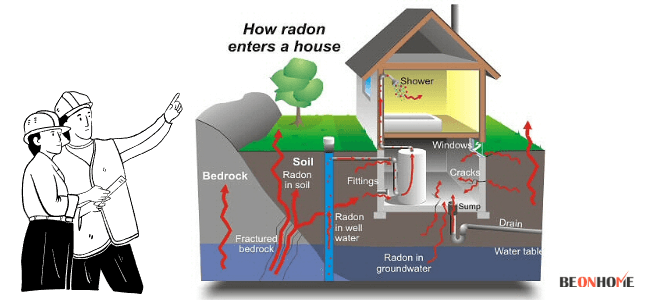
A radon-resistant new construction (RRNC) takes a passive mitigation system into account. It is the one where there is no need for energy and fans. If the levels of radon are very high, the existing passive system can be converted into an active system.
It is done with the installation of in-lining fans. If a passive system is installed properly, it is sufficient in itself. It can keep the radon levels down without the help of the radon fan. Make sure to choose the radon fan that’s best for construction purposes.
Radon techniques vary from different foundations to various site requirements. Location can be one of the factors too. But there are some common techniques and features accepted in most radon-resistant constructions. But don’t forget to install an alpha test radon detector kit even after following all these techniques to be sure about your safety.
1. Gravel/ Gas-Permeable Layer Of Aggregate
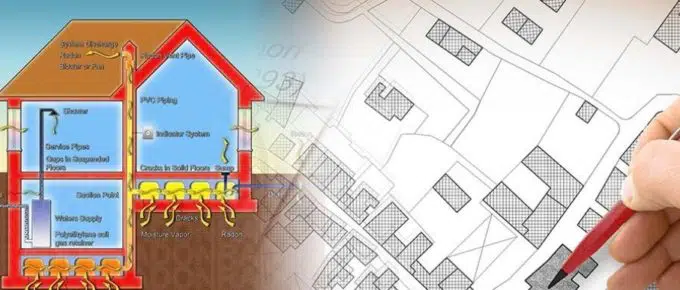
This feature includes the instalment of a 4-inch layer gas-permeable layer. The material used for this layer is clean gravel. Gravel is very porous and thus allows the gas to move without fetter underneath.
It doesn’t restrict the movement of the gas beneath and prevents the gas from entering the house. Because of this, it is also called ‘The airflow layer. The gas-permeable layer is placed beneath the slab.
In some locations, gravel may be expensive or unnecessary. Therefore some alternatives are also used instead of clean gravel. A drainage mat (also known as soil gas collection mat) or a perforated pipe can also be installed.
2. Heavy-Duty Plastic/ Soil Gas Retarder
Here, heavy-duty plastic/Polyethylene sheeting on the gravel- the gas-permeable layer is done. It is a primary barrier supporting any cracks that may form after the slab gets cured. It clogs the gas-permeable layer. Also, it prevents the concrete slab from flowing when poured.
3. Radon Collection Point
A schedule #40 PVC pipe stub is used for the installation of this. Concrete is poured around the pipe stub. The radon collection point should not be impaired while pouring concrete. Installing a soil gas collection pipe (drain-tile) or PVC tee makes sure of this.
4. Vent Pipes During Plumbing
Run radon vent pipes through the interior walls of your home. Install a pipe like the plumbing ones, 3 to 4 inch PVC Schedule 40 pipe for most CFM when the system is activated. Install it in a vertical way from the gas-permeable layer forming an upside-down ‘T’.
Then through the conditioned space till roof at a place that grants future access. A natural effect of air being pulled through the pipe occurs(difference in air pressure). It pulls the gases out of the soil in turn.
It should terminate the gases at least 12 inches above the roof surface. This will vent the harmful gases outside the house. The pipe label reads- ‘Radon Reduction System’, on each floor of the house. The stack should be away from the doors, windows, or any other opening at least ten feet.
5. Caulking Or Sealing The Walls
Radon is naturally found right below your feet. It’s important to seal all possible ruptures, plumbing penetrations, small holes, or crevices.
These may occur in the concrete floor, wall, control joints, and cold joints. A polyurethane or silicone caulk is effective for sealing them. It will keep you safe from other harmful soil gases too.
Seal a sump if any with an appropriate air-tight sump cover. Otherwise, it can be one of the primary points of radon entering your home.
The cover should be in such a way that it can be removed when the sump needs some working upon. Use expandable/concrete foam sealant for sealing the pipes after the plumbing work.
6. Electric Junction Box
In need of a robust system alongside a vent fan, an electrical junction box should be installed. Set it somewhere in the attic. It should be within reachable distance of the vent pipe.
This will allow a power supply to be used when the radon control system needs to be activated in the future. It’s cheaper and easy to run electrical wiring during construction than installing later.
7. Roof Flashing
Roof flashing is taken as a precaution for the vent pipe. After the vent pipe is placed above the roof, it prevents any leakage around it.
Many of the techniques like using gravel, plastic sheeting, sealing, and caulking are already applied for moisture control. This makes this construction, even more, cost-effective because now fewer techniques have to be used.
How Can You Install It?
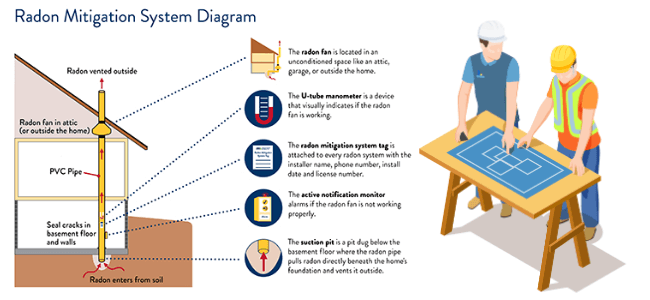
The purpose to install a mitigation system is to reduce radon levels indoors of any building. It can help reduce the year-round levels below 2 pCi/L (picocuries of radon per liter of air.)
It continuously uses a vent fan the pull the soil gases and exhausts them outside with the help of a pipe.
- Gravel is installed beneath the slab floor of a basement or crawlspace.
- Polyethene sheeting is placed above the gravel layer.
- Appropriate caulk and sealant for sealing all cracks and unwanted openings.
- A sump pump system should be installed
- To make the normal mitigation system into an active system, an in-line fan is installed.
- For installation, the radon fan should be located outside.
- Checking the working of the fan is also very important. For this, two fan monitors- a notification monitor and a U-tube monitor are installed.
Radon Entry Points
Radon can with ease move upward into the atmosphere. The potential points from where it can easily elevate into your houses are:
- Basement – from cracks in the base slab or control joints
- Slab-On-Grade – even if there is no basement, it can enter from slabs that are placed on the grade.
- Manufactured Houses – Interior materials like gypsum, etc. may contain radon along with them.
- Crawl Space – A difference in vacuums can result in gases entering the house.
Is It Possible To Seal Radon Through Concrete?
Concrete is a porous material. It’s an operative barrier to prevent soil gases from passing through it. But provided there are no holes or cracks in it.
A radon-resistant building can be easily built using concrete. It is very cheap and feasible too. But in cases of high radon levels, just a normal slab of concrete won’t be advisable.
Sub-slab ventilation or plastic sheeting beneath the slab would act more effectively. This will evacuate the gases beforehand beneath the concrete slab to outside.
It can be an effective material to be used for radon-resistant buildings. But just using concrete as the material for radon safety won’t be smart.
Performing A Radon Test After Completion
After completion, the success of the whole system needs to be evaluated. This is done by performing a radon test. It evaluates the productivity of your passive radon reduction or mitigation system.
The system should reduce the radon levels below 4pCi/L or not. If not, switch to the active system which makes the vent fan come into play.
Retest the radon levels to check the working of the active system too. Insert a U-tube manometer to ensure whether the fan is working or not.
Final Talk
Your health should always come first. A radon-resistant construction keeps you away from other unknown harmful soil gases too. It is effective, simple to install and upgrade. The techniques use simple technology and common easily found material. In long run, it can help the owner to save additional costs. Make sure to perform a radon test at last for evaluating and to live radon-stress-free.


Leave a Reply