After buying an automating gate opener you must be wondering how to install it. We know it’s one of the tedious tasks to do. We have tried and tested a few methods and found the perfect one. Below you can discover the step by step guide to install the gate opener. You can follow the steps to install an automatic gate opener and secure your home. It helps to lock the gate instantly when it is closed after coming inside or going out.
How To Install
Quick Navigation
Step 1: Installing The Gate
The foremost step is to install the gate properly. By saying properly we mean in alignment and on a perfect height. If you are using two gates make sure they are at the same level. While putting them in place make sure of the height they are at.
If they are way too low, they might not open and close effortlessly. And if the height is too high, animals, if not humans, may sneak from below it. Once you have them centred, aligned, and well placed, you can jump to the next step.
Step 2: Unbox
Isn’t this the most exciting part? Well, you should open the entire box and check for all the stuff. Make sure nothing is missing or damaged. You will find the arm(s), the motor(s), the clamps, the control box, a remote, and a few screws.
If you have ordered a solar-operated gate opener, you will also find a small solar panel and a battery. And please don’t throw the user guide or manual away. They will add to your knowledge of the installation process.
Step 3: Connect And Test
Before you mount the arm and the controller onto the gate, you can run a test. Connect the arm(s) to the controller and connect it to an electricity source.
Check if the controller is working. If you want you can also have a look at the mechanics of the arms. If the controller and the arms are both functioning seamlessly then we should move on to the next step.
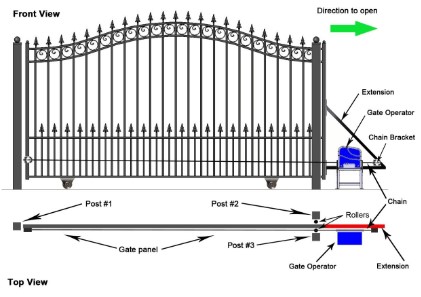
Step 4: Installing The Arm
The immediate next step is to mount or install the arm(s) on the gate. Make sure you do it while the gate is in the open position. Screw the clamp in the middle of the gate and then attach (screw) the arm to the clamp. While installing keep a check on the alignment of the arm.
It should be even throughout the length of the arm. The back of the arm should be attached to the clamp while the front holds the door. The door will close when the motor in the controller pulls (or pushes depending on your settings).
Step 5: Attaching The Controller
Now to put some life in the arm(s) attach the controller to it. And be careful with the wiring. Remember the rule red wires with red plugs and yellow wires with yellow plugs. Now you can provide power to the controller. If you have a solar gate opener then it is time to get the solar panel in action.
Attach it here, and then attach the battery as well. You might have as well received 2 batteries, make sure you attach both of them. If you have one which runs on direct electricity, you can resort to attaching it to a power plug.
Step 6: Attach Together
As you have done all the hard work, you can reward yourself with the sight of a fully functioning door. Now you will need to set the limits of how much the door opens and closes. With the remote open it to the desired level. And then press the memory button on your controller (check for it on the manual). Repeat it for the closing limit as well.
a. For Two Gates
If you are using two gates, then one of them is primary and the other is secondary. When you close or open them with a remote, the primary will stop at the preset level. Continue closing or opening until the secondary gate also reaches the desired level. Press back the memory button again.
b. For Automatic Closing
You can also set your door(s) to close automatically after a certain time of opening them. With this feature, you have to press the remote only once for opening them and after the set time, it closes back.
Step 7: All Done
You have done everything you need to do. All you need to do now is to relieve yourself of the duty of opening and closing the gates. AI will be doing that for you now.
What Is Inside The Kit?
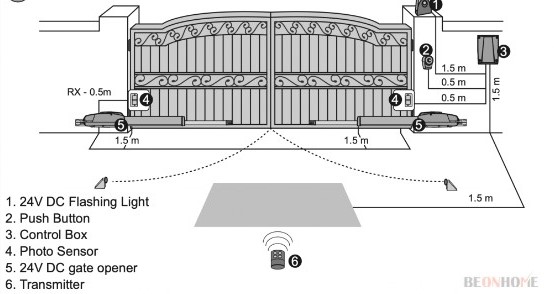
The kit includes one arm or two as per your order. The arms come with a cable around 6′ long. You can attach the arms to the controller with the help of this cable. A system control box with a controller is something you can call the brain of this system. Mounting brackets, clamps, and fasteners are also included for their specific purposes. Few for the arms and few for the controller box.
With these, you get a standard remote transmitter, of course as this is why we are getting these. Although this article may make you feel that the manual is not worth your attention, it still is. As every company may have different control settings, you will need those manuals.
If it is a solar gate opener you will also get a petite solar panel accompanied by one or two batteries. If not, then you will receive a resettable AC transformer. And a battery transform. Now except these all, you might get vivid products depending on the companies offer. if you receive warranty or guarantee cards, make sure to keep them safe.
How Much Does It Cost?
Costing can differ entirely based on the supplier, size of gates, and material. Considering the average, it may cost you anywhere between $2000 to $5000. This excludes the cost of the automatic gate opener. The price of which may range between $250 for a single gate to up to $700 for a dual gate system.
Other Costs
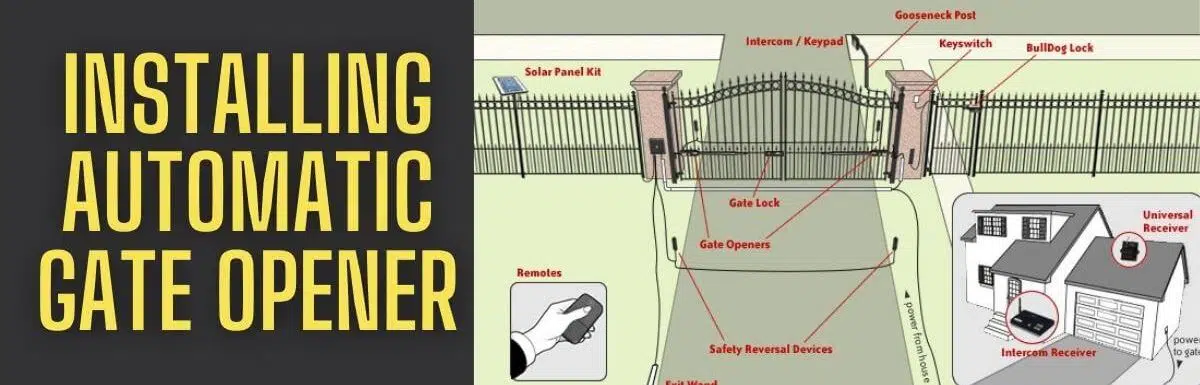
Except for the mainstream cost, there are several other costs. Security camera systems, intercom, sensors, keypads, automatic gate locks, etc. After all this cost, there will still be installation charges. Which we made an attempt to save for you. Installation may also cost you from a few hundred dollars to a couple of thousand.
Can You Install It Without Any Help?
The absolute answer is yes. You can surely do this without any help from anybody. You have also read this step-by-step guide and also have a manual which will both assist you. Even if you don’t have any prior mechanical or technical experience, this is your chance to get some.
Although in this guess you should take at least superficial help from someone. And we have all heard the saying that two heads are better than one. So if you have easy access to help then reach out for it. And if not, then you are self-sufficient to do this task.
Final Talk
With this in-depth article, we hope to have helped you in some sort of way. There are multiple types of gate openers, While buying one, consider the size and the weight of your gates to make sure you pick the best automatic gate opener for your gates.


Leave a Reply