Xfinity does not require any introduction as it has been on the list of the top internet service providers in the USA but do you ever tried using it with a mesh router like Google Nest WiFi for excellent connectivity?
It can also give you a relatively high speed but Using both devices together requires a proper setup. This article will talk about the step-by-step guide to Setup google nest wifi Xfinity comcast.
Setting up Google Nest WiFi Xfinity Comcast: How To?
Quick Navigation

Setting it up is an easy process to follow. One must take care to use it successfully. There is a bridge mode required which we will discuss in this section.
Google Nests will come to the rescue and can be used as a connection extender. Read through to know about both device’s compatibility and connection procedure.
Have a look at the advantages of having a setup as such:
- It assures you improved speeds.
- The signals you are getting are of high quality.
- The process of extension is easy and quick.
- Support of devices.
- Comes with the simplicity of management.
- No rental fees for the router.
Let us look at what we all must do for a successful setup.
Pre-requisites
- Xfinity modem-router combination.
- Personal Router and Modem.
1. Log in to your Xfinity Gateway.
First, you need to connect the Xfinity Gateway Modem-Router. Connection should be made using an Ethernet cable. Once you join the device, you must enter 10.0.0.1 in the section for URL. Press enter and wait for the page to take you to Xfinity Gateway Screen.
While you are on the page, log in using your credentials. Do not worry if you do not have the credentials. For example, you can use the following certifications:
Username – admin
Password – Password
2. Click on Gateway At a Glance.
You will see a Getaway tab on the left side. Once you log in, click on this tab. Then, click on a getaway at a glance.
3. Enable Bridge Mode.
Look for a toggle option near the bridge mode. Could you enable it to switch on this mode? Do not worry if your WiFi on Xfinity gets disconnected, as we will use Google Nest WiFi. You will see a warning in which you have to press Ok. You can log out when the bridge mode is enabled.
4. Press Confirm.
Authorize the changes by clicking on the confirm button. This step is essential to process all the changes made.
5. Connect your Xfinity Gateway Modem-Router to Google Nest WiFi.
Now, use the ethernet cable to connect to Xfinity Gateway Modem-Router to the WAN port. Find this port in your Google Nest WiFi. Look for a globe sign on the left to connect the two ports successfully.
6. Restart All Devices.
Once you are done with the above processes, reboot all the devices. Towards the end, a restart is required to let the device function all the changes.
Even after completing the whole process, some may find connectivity issues. Do not worry; we have you covered.
Follow the steps below to fix these issues, if any.
Step 1- Slow WiFi Speed on Nest WiFi.
The root cause of the malfunction can be a slow internet connection. This problem occurs when 80% of your capacity is allocated to a single device. You can undo this by following some elementary steps. These steps are:
- Switch on the Google WiFi on your cellphone.
- Go to the Network Setting tab and select Privacy.
- Come back to the settings and now tap on the priority device. You can go ahead and disable the cloud service. Enable it back within 15-20 seconds.
- Choose a new priority device. This device should not be the one already selected by you. The time frame can be any period.
- End Priority and save all the settings made.
- If it doesn’t help, just reset your nest wifi. It’ll blink a yellow light for some time and your internet will start working fine.
Step 2- Double NAT
As both devices can begin routing, this may cause a hindrance to inefficient running. However, you can resolve the double network address translation problem very efficiently.
You can disable the firewall of Xfinity to get rid of this problem. The step-by-step guide is mentioned below. Ensure that you follow all the steps mentioned above till the Gateway tab.
- Select the firewall tab on reaching getaway.
- Tap on the Custom Security.
- Click on Disable Entire Wall.
- Save all the changes you made for it to start functioning.
How Do I Set Up Nest WiFi With Existing Router?
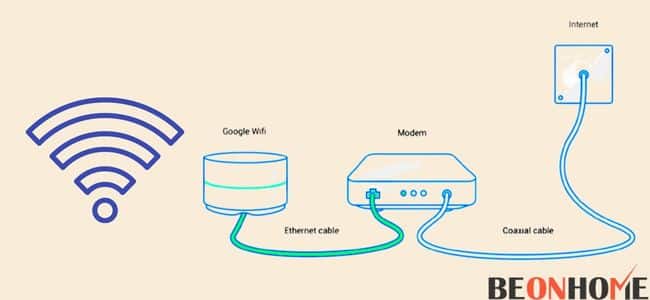
To utilize Nest WiFi with an existing router, ensure the following:
- The current router is associated with the modem.
- The Nest switch is associated with the current router.
An issue surfaces when the Nest WiFi network and your past WiFi network can’t communicate. You can place the current switch in bridge mode to avoid this issue. NEST WiFi clients with a modem/switch combo will likewise have to utilize a bridge mode.
- Make sure that you have it connected to the modem.
- Plug the switch into a PC utilizing an Ethernet wire. If your PC doesn’t have an Ethernet port, you can purchase a connector that accommodates your PC.
- Enter IP address details in the search bar.
- Enable the bridge mode using the router settings.
How Can I Boost My Xfinity WiFi Signal?
You can use the following methods to boost the Xfinity WiFi Signal.
1. Check for router placement first.
You should take care of the placement. The location should be central and close to the primary devices. You can use Xfi pods to extend the connectivity.
2. Restart Frequently
We recommend this process to get rid of some bugs. In addition, it updates your software and makes your device efficient.
3. Right Network
Check the WiFi settings to see if you are using a public server. Use the personal to boost up the signal.
4. Miscellaneous Settings
While you are on it, check for the following pointers as well:
- Single WiFi Name for Home network
- Connect Devices with a high bandwidth (Using Ethernet ).
- Check for bridge mode settings.
- Have a look at the Antennas.
- Consider a more speedy plan.
- Technical limitations of devices that are outdated/ Consuming more internet.
- The distance between both devices.
Final Talk
This article will help you set up your devices as per your needs. Use this article as your ready reckoner. Instead of toggling different sites for various information, use the above steps.
The process is easy but needs attention to detail. Successfully connecting and running these devices is made a cakewalk for you.

Leave a Reply