Flags have been proudly displayed for thousands of years. It’s not just a decorative item, nor is it something to be admired for its own sake. But, have been proudly displayed for thousands of years. But it is necessary to know the way to make both regular and wooden flag poles and we have suggested some ways to do so below.
Steps To Make Flag Pole
Quick Navigation

Here we have compiled detailed steps that you can follow to make a pole at home. However, make sure you have bought and assembled all the necessary tools and materials.
Total Time: 2 days
Step 1- Preparing The Sleeve
If you’re utilizing the pole sleeve approach, all you have to do is take one end and fold it into a pocket, exactly like a window curtain. Add your tab to the end that stays closest to the top end of your flagpole for a home-mounted flag with a pole sleeve. You have two possibilities for a grommeted flag. You can either add a header which is a thicker canvas, to the end of your flag or stick the grommet through it.
Step 2- Preparing The Hole
Wrap plastic wrap around your PVC pipe up to your mark. Tape the plastic wrap in place. Vaseline or similar petroleum jelly should be used to coat all of the plastic wraps. You must coat all of the plastic with petroleum jelly so that the flagpole may easily be removed from the concrete.
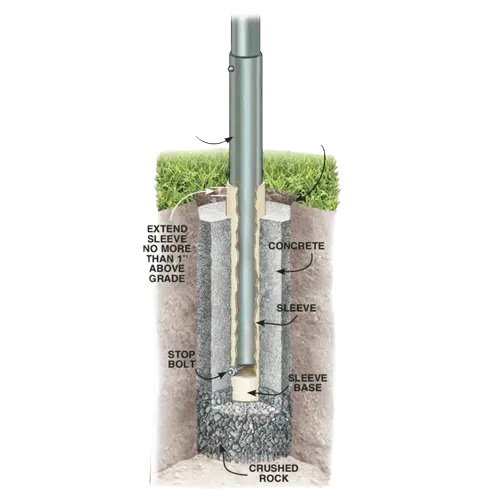
Mix the concrete according to the manufacturer’s instructions in a separate container. Fill your bucket with concrete to a depth of 2 inches and set it aside for a few minutes. Place the PVC pipe’s wrapped end into the 2-inch concrete. Make sure your pipe is straight by using your level.
While more concrete is poured into the bucket, hold the PVC pipe stable (or vice-versa). Fill the bucket only halfway; else, it will be very heavy. If you purchased quick-drying concrete, the concrete should dry soon. Keep the PVC pipe in place until the concrete has hardened enough to support it.
If you can prop the pipe up against something to keep it in place, do so. Wrap plastic wrap around your PVC pipe up to your mark. Tape the plastic wrap in place. Vaseline or similar petroleum jelly should be used to coat all of the plastic wraps. You must coat all of the plastic with petroleum jelly so that the flagpole may easily be removed from the concrete.
Step 3- Preparing The Cleat
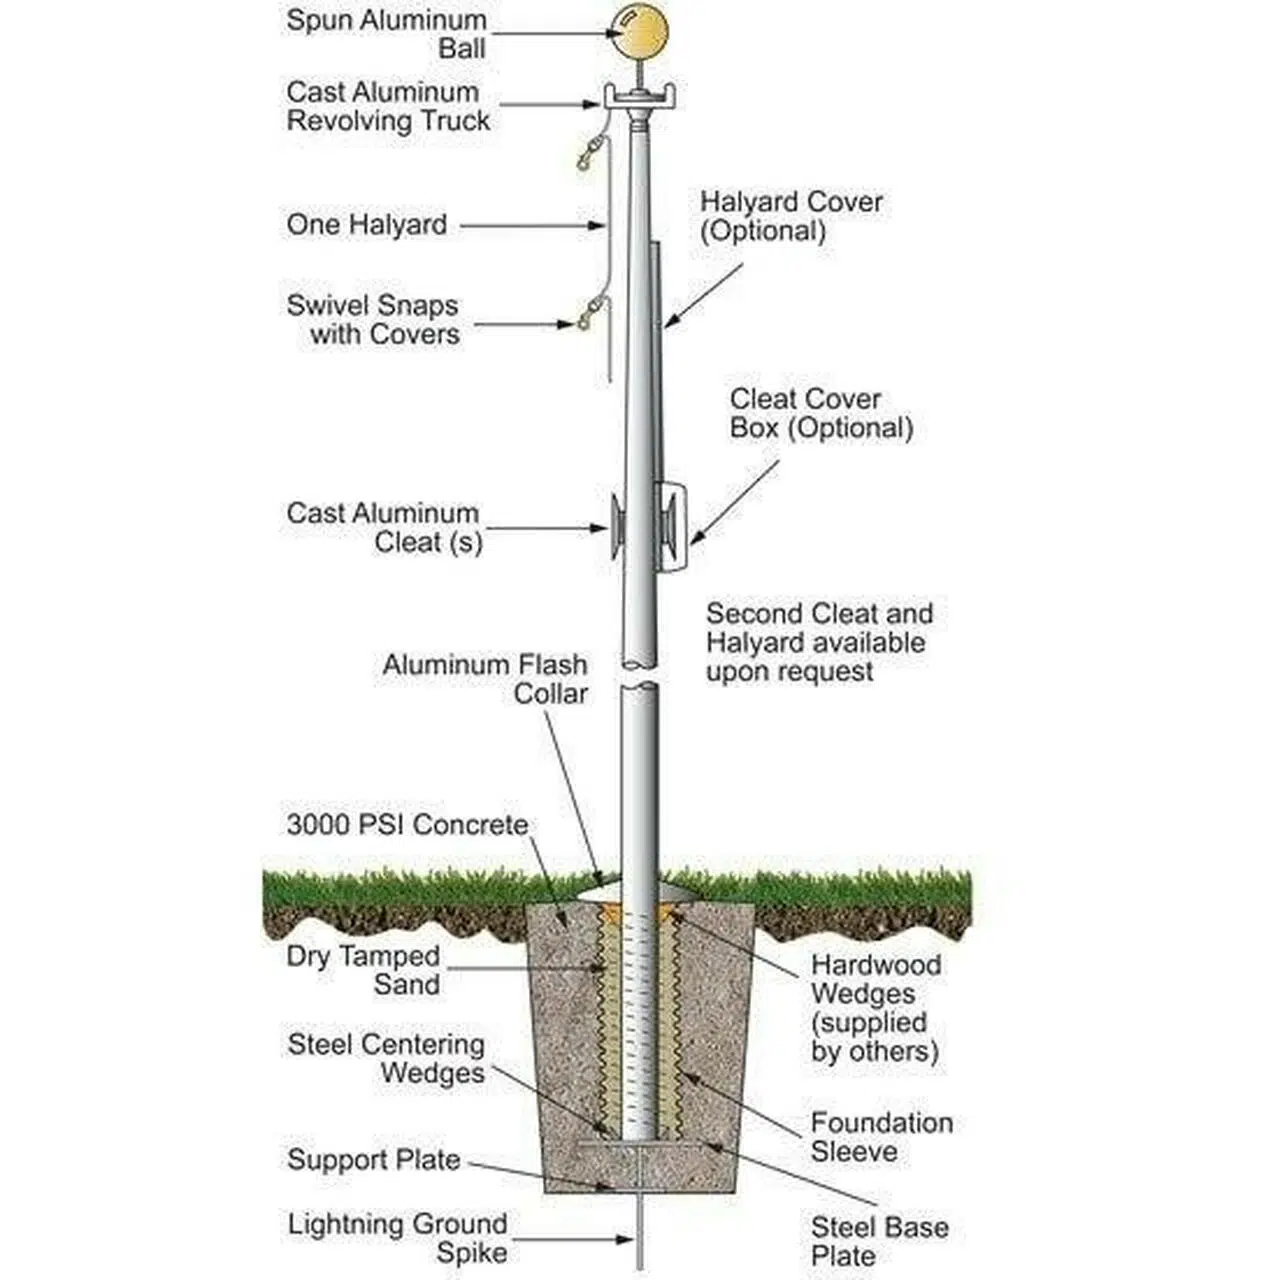
You’ll need a cleat to keep the rope in place on the flagpole, which you’ll be adding. Mark the pole’s midpoint with a tape measure and a marker. The halyard, or rope, is secured with a cleat at the foot of your flagpole to keep your flag flying high.
You may buy a rope cleat kit at a hardware store, a flag store, or online. Screws will be supplied as part of the product. Make holes using a power drill to make it simpler to attach the cleat onto the pole. Use a bit with a diameter slightly smaller than the cleat screws.
Step 4- Preparing The Pole
Raise the flagpole and slide it inside the PVC pipe carefully. This task will need the assistance of a few people. When the flagpole is in the pipe, use your level to double-check that it is straight. For a small job, a bag of dry mix, which contains the concrete, stone, and sand all in one bag, is the best option. For a single flagpole, one bag should be sufficient. Place the ground sleeve upright in the centre of the hole. Before laying concrete around it, make sure it’s straight with a level. If you think a flagpole is not tall enough You can install a high-quality extension pole to raise your flag a little higher.
Step 5- Preparing The Rope
Choose a rope that is the appropriate length for your flagpole. The rope should be roughly one foot longer than the PVC flagpole’s whole length. By looping it through the pulley, you may hang it from the top of the pole. Use flag fasteners or carabiners or other fasteners that are made particularly for flags. To keep them in place, string them onto the rope and tie a knot under them.
Step 6- Raising The Pole
Through the eyelets on the end of the flag, attach it to the fasteners. Then, at the top of the pole, raise the flag. To hold the rope in place, it should be wrapped around the rope cleat.
Attach your flag hooks to the rope that has been looped through the pulley. You may now proudly show your flag whenever you choose. You can either instal your pool in the ground or you can have a good portable pool with a stand for your flag.
Step 7- Lighting The Flag Pole
It is customary to show the flag only from dawn to dusk. However, if a patriotic impact is desired, the flag can be displayed 24 hours a day if suitably lit throughout the hours of darkness.
However, simply igniting the flag isn’t enough. You must also illuminate the pole to produce a visual journey that begins on the ground, extends into the sky, and culminates at the magnificent flag. But how can you light a flagpole?
just buy a high-quality flagpole light under your budget.
Step 8- The Fixtures
Because of the tiny beamwidths required for illuminating a flag, directional lights must be employed. Spotlights or in-grade lights can be utilized as directed lights. When it comes to placing lamps on turf, in-grade lighting is frequently the best option.
Alternatively, our brass or copper spotlights can be staked into the ground, or an aluminium spotlight can be attached to a pole using our flag pole mount. Keep in mind that when utilizing an aluminum flag pole mount with brass spotlights, the aluminium mounting threads will corrode with time.
Estimated Cost: 100 USD
Supply:
- NA
Tools:
- Drill
- Screwdriver
- Rope
- Buckets
- PVC Pipe
- Tape Measure
- Marker
- Shovel
Materials: Water,Petroleum Jelly,Plastic Sheet,Duct Tape,Rope Cleat,Hooks,Carabiners,Rope,Buckets,PVC Pipe,Cement
How Many Fixtures Do You Think You’ll Need?
To illuminate a flag, you’ll need at least two, but ideally three, fittings. This prevents the flag from being obscured by the pole’s shadow.
Where Can You Locate It?
One fixture must cast light on the pole as near to the ground as feasible to illuminate both the flag and the pole. This fixture should be mounted on the pole itself or within 1 foot of it. If more than one fixture is used, the others can be placed wherever is most convenient, at any distance from the pole. A single light fixture can be used to illuminate the pole, which is nearly typically white and uses significantly less light than the flag.
The brightest objects in your illuminated landscape should be your flagpole and flag. Because the flag’s red and blue colors absorb a lot of light, they require very bright lighting.
Only one light fixture is required to illuminate the pole, which is nearly typically white and takes significantly less light than the flag. This is a bright (650 lumens) fixture with interchangeable optics, including 12 and 24o beam spreads, which are likely to be needed for your flag.
Because the light output of LED bulbs is slightly higher than that of lamp-ready fixtures, choose bulbs that generate more than 300 lumens. The brightness of LED bulbs is expressed in lumens rather than watts.
How Narrow Or Wide Should It Be?
Use the smallest feasible beam spread to focus as much light on the flag as possible. Because the flag can wave in any direction, the beam must be wide enough to illuminate the flag completely regardless of where the flag pole is. If your flag is 6-feet wide, for example, the beam spread must span a circle with a radius of 6 feet from the pole. If you’re using multiple fixtures to achieve this beam spread, make sure they’re all aimed in the same direction so their beams overlap.
How To Mount A Diy Flag Pole?

Assemble the pole and any included attachments after the concrete has dried. A flagpole kit should include all of the necessary components, as well as a flag.
Some flagpoles may require flagpole brackets or other flagpole accessories, so read the manufacturer’s instructions carefully. Place the flagpole in the ground sleeve once it has been assembled. Raise the flag with the provided rope or snap hooks once the pole is in place.
Common Terms About Diy Flag Pole
a. DIY Flag Pole Christmas Tree
To make your Christmas even more beautiful, you can build a Christmas tree around a flag pole. Turn a flag pole into a mega tree and make your yard as bright at midnight as it is in the middle of the day.
b. DIY Flag Pole Christmas Tree Lights
Strings of lights are connected in all directions to surround the flag pole. The lights are evenly marked and set across a ring (measured and marked with a sharpie). They’ve all turned into a giant octopus after being illuminated.
c. DIY Flag Pole Holder
Using a 4×4 piece of wood, cut out a 10-inch block. With a spade bit, drill a 1 1/8″ hole in the top, about 5 inches deep, and cut it off 45 degrees on the other end.
If the flag already has a hole in it (if it doesn’t, you can always cut a small hole). Also, drill a hole in the pipe and secure it with a screw.
d. DIY Flag Pole Stand
The best option for a small flagpole stand is to purchase a bag of dry mix, which contains the concrete, stone, and sand all in one bag. For a single flagpole, one bag should be sufficient. Pick up a bucket that isn’t going to be used for the flagpole base. Add the mixture to the bucket and slowly pour in the water, mixing it up as you go, unless the package says otherwise.
With a shovel or a hoe, mix the cement. When the cement easily slips off the tool, it’s the right consistency. Place the pole in the bucket. Take the bucket that will serve as the flagpole’s base. Hold the PVC in such a way that the plastic-wrapped end is directly in the centre of the bucket.
It’s best to use a level to ensure that it remains perfectly straight up. Fill the base bucket with cement. Make sure the liquid is evenly distributed around the pole.
Concrete should be at least half-filled in the bucket. Hold the PVC in place for a few minutes, or until the cement forms a crust on top. Leave the cement to dry overnight and your DIY flag pole stand is ready.
e. DIY Flag Pole For Truck
Here’s how to make a Flagpole for your truck for less money. With simply a PVC pipe and a few tools, you can proudly and affordably fly your flags. Place the PVC pipe in a vice grip to keep it from moving while you screw the eye screws in. To hold the PVC pipe steady if you don’t have a vice grip, use a pair of channel locks large enough to drip around it.
After you’ve attached your DIY flagpole to your truck, ensure sure the top of the pole is securely fixed. As a result, as you drive down the road, the wind will not break your flagpole or cause it to fly out of your vehicle.
Final Talk
The tradition of flying a flag from a flagpole will never fade away. Other display options, on the other hand, have shorter lifespans or popularity spikes. A flagpole is an excellent way to draw attention to your business while also providing a professional and impressive way to greet visitors and guests. By these simple DIY methods, you can have your Flag pole and celebrate the unique character of your area.


Leave a Reply