Whether it’s about protecting your family from burglars or keeping an eye on your kids, we believe that everyone should invest in a Door Alarm. We have gathered very simple steps to make a door alarm with household items. Building a DIY sensor might seem complicated but it isn’t that difficult. All you need are basic tools like a drill, screwdrivers, wire stripper, plier, and a small pry bar which are easily available.
Methods To Build A Door Alarm With Household Items
Quick Navigation
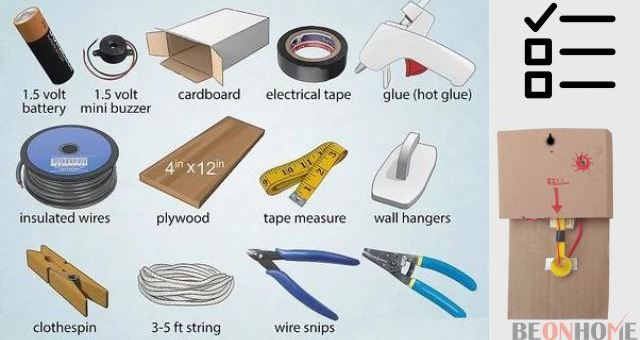
Whether it’s your first time making it or if you have made this before, you will at most require an hour to make this considering you have all the materials required to make this. Follow these steps to make a door alarm with stuff available in your house.
1. Attach The Plywood
After you have gathered all the materials, the first step is to prepare the base of the alarm i.e. plywood. The plywood should be attached to the topmost part of the door approximately no more than 30.50 cm (or a foot) from the door frame.
You will have to drill holes in the plywood so you can hang it using the hangers or you can attach it to the wall using tape.
Alternatively, you can also use a desk, bookshelf, or nightstand which are positioned close to the door to place your alarm flat on it. By doing it this way, you won’t have to hang the alarm.
The one thing you should make sure of is that the alarm isn’t placed too high as it will make it difficult for you to activate or deactivate the alarm, not only that, it will also require more strings in doing so.
2. Cut The Insulated Wire
After you are done attaching the plywood, the next step is to cut the insulated wires. For this, you can use Wire strips or a sharp pair of scissors. Now with the help of those sharp pair of scissors or wire strips, carefully cut three strands of wire each one foot (about 30.5 cm) long.
Bending the wire will make it easier for you to cut them, you can use your measuring tape or a measuring stick and bend the wire exactly where you will be cutting it. If your scissor isn’t that sharp, you can also use a sharp knife, like a utility knife to cut the wire.
3. Strip Each Strand
Each of your wires should be covered in the insulated coating, you will have to remove them by using a wire stripper. You can do this by marking the wire and then placing them inside the slot on the stripper.
The wire placed inside the slot should be about 2 inches (about 5 cm) long. Repeat this step for each strand on both ends. You can also use a scissor or a utility knife if you don’t have wire strippers.
After this, you need to cut the wire to the point where you can see the metal wire inside, and then you can peel off the insulation. If there is a need to, you can also use pliers to completely pull off the insulation.
4. Build The Alarm
Now it’s time to finally build the alarm. These are the steps that you need to follow to correctly set up the alarm:
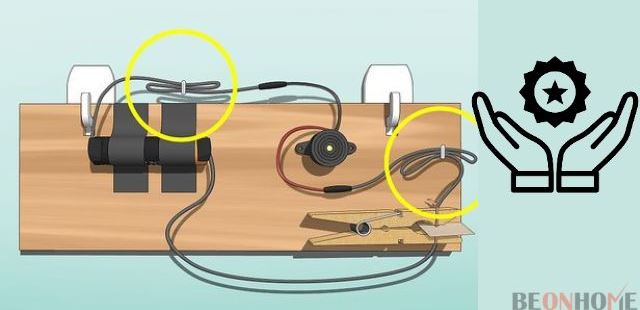
A. Attach the buzzer and battery to your wooden board. With the help of electrical tape, attach the buzzer and battery to your wooden board. Make sure that you don’t accidentally cover or interfere with any connection for the electrical circuit of your buzzer. Also, You have to make sure that the tape doesn’t cover the (+) and (-) ends of the battery. Depending on your buzzer, it may come with screw holes, so use small nails to attach the buzzer to your wooden board, make sure the nails are small so that they won’t protrude.
B. Wrap the stripped wires around the ends of the clothespin. Around the frontmost divot of your clothespin clip-end (around the top), wrap one stripped end of two pieces of wire. Stabilize the stripped wires by properly adjusting them until it’s completely unyielding.
C. Connect the bottom-pin wire to the battery. Position the wire in such a way so that it is directly touching the battery’s (+) end. Use electrical tape to hold the wire in place.
D. Connect one non-battery wire to the buzzer. On your buzzer, there should be a small opening to insert the wire. You will also find that there are two connectors, namely a positive (+) and a negative (-) one. Now you have to make sure that one of the clothespin top wires is directly touching the (+) input for the buzzer.
E. Break the circuit with a Non-Conductive Material. With the help of the non-conductive material that you are using, you can break the circuit by having it inserted in the middle of the wires enclosed on every side of the clothespin. Now, on the negative (-) end of your battery, affix the metal side of your remaining untied clothespin wires. Then attach the final stripped wire to (-) input of the buzzer. Make sure to cover the bare wires with electric tape, otherwise, it might result in an electrical shock.
F. Finish the circuit to test the switch. Put your alarm on a smooth surface and unfasten the non-conductive material used to cut off the circuit. If everything was done correctly, the circuit should be complete and the buzzer will go off when the clothespin closes.
G. Check connection and battery if the buzzer doesn’t activate. If the buzzer didn’t go off, it could be because one of the connections is loose. Reinsert the circuit breaker (your non-conductive material) and refasten all the connections.
5. Install The Alarm
After you are done making the alarm, now it is time to install it. Just follow these steps to install the alarm properly:
1. Carefully remove the wooden board. Your battery and buzzer should already be attached to it by the tape. Position the clothespin close to the battery and the buzzer and glue it to the board.
2. For the excess wires, you can tape them to the board to prevent pulling. Then hang the board to the wall.
3. Make a small hole in your non-conductive material with the help of scissors, and then use a simple knot to tie a string to the hole.
4. Attach the other end of the string to the doorknob or you can also tape it to a part of the door. Make sure it is adjusted in a way so that when the door opens, the string is pulled. This will pull out your circuit breaker and the alarm will go off.
Tools:
- 1.5-Volt Battery1.5-Volt Mini Buzzer
- Electrical Tape
- Glue Stick
- Glue Gun
- Wooden Clothespin With Spring
- 2 Glue Based Wall Hangers
- 3 Small Gauge Insulated Wires
- 3-5 Ft (.91-1.5m) Of String
- 4 X 12 Inches (10.2 X 30.5 Cm) Or A Larger Piece Of Plywood
- Tape Measure Or Measuring Stick
- Wire Snips Or Strong Scissors
- Wire Strippers
Materials: NA
What Is A Door Alarm With Household Items?

A door alarm with household items is an alarm that can be made using your household items and just like other alarms it also performs the same functions as them.
A door alarm with household items can be used to keep your family safe and you can also use it to monitor your kids or pets if you want to. It is a handy tool that can be used for several purposes. A door alarm with household items is a must if you want to live securely and are on a tight budget.
Types Of Door Alarm With Household Items
There are a plethora of Door alarms you can pick from, depending on your understanding and your skills, you can make different kinds of alarms for different needs. Here we used a buzzer to make an alarm, but if you don’t want to use a buzzer and want to make a different kind of alarm, you can do that pretty easily depending on your understanding.
Here are some other alarms without buzzers that you can use:
1. A light-based alarm: Instead of a buzzer, you can use a bulb to make a light-based alarm. So instead of a buzzer going off, in this alarm, the light will turn on when the alarm goes off. This can be used if you are dead or maybe don’t want to deal with the sound of the buzzer.
2. A radar-based motion sensor: This alarm sends out bursts of microwave radio energy and if the energy comes in the same pattern, the alarm will not trigger. But in the case of an intruder, the pattern will be interrupted and the alarm will go off. This is more secure but pretty difficult to make
3. A photo-sensor-based motion alarm: This alarm uses light to detect intruders. When the beam of light is disrupted because of an intruder, the alarm goes off. Just like the radar-based alarm, this one is more secure but pretty difficult to make.
Advantages Of Door Alarm With Household Items
Here are some of the advantages of a door alarm made with household items:
a. Prevents Crime: The biggest advantage of any sort of door alarm is that it helps in preventing crime.
b. Notified in case of fire or gas leakage: You will be notified immediately if there is any sort of fire or gas leakage in your house.
c. Protects your assets: Whether it’s your house or your office, a proper security system keeps your assets safe from robbery.
d. You can keep an eye on your kids: With a door alarm, you can keep an eye on your kids especially if you have forbidden doors, you don’t want your kids entering your house.
e. Gives you a sense of security: Whether it’s a DIY alarm or the one bought commercially; it gives you a sense of security. Which will help you focus on the task at hand and be more productive throughout the day.
Final Talk
Learning how to make an alarm from start may seem daunting at first but is pretty easy when all things are considered. A DIY alarm is very useful especially if you are on a tight budget and can be made for under $50. Moreover, you can always choose a good door stop alarm under your budget. It might not be as complicated as a commercially sold one, but a homemade alarm still offers basic protection that’s what matters.




Leave a Reply