You have bought a security camera and trying to install it yourself. Then you discover that the installation method is more complicated than you ever thought it would be. The security camera is connected to a network video recorder (NVR) via a Power over Ethernet (PoE) cable, so a line must be run from the camera to the receiver. you can get a good PoE switch under your budget . This means setup can be tricky if the receiver is in the basement and the camera is at the front door. To ease the setup you can prefer a good PoE injector for your router.
You certainly have to run the wire through the basement. Or do you have some other passage in your mind? If you are thinking of handling this yourself, here we got you a step-by-step procedure to Install Security Camera wiring.
How To Run Security Camera Wiring?
Quick Navigation
Installing a CCTV camera is similar to installing an IP camera but will require certain types of equipment.
1. Find A Good Spot For The Camera
A. The entrance door
This is the most visible way for burglars to access your house, where most break-ins occur. Consider placing the equipment on the second story or installing a wire cage around it to prevent any things from being hurled at the sensitive CCTV cameras.
B. Doors on the back and sides
Any entrance into your property is a potential entry point for a criminal into your personal space. Install cameras on all your doorways, as these are your most susceptible areas.
Patio and French doors are particularly vulnerable to break-ins, reinforcing their security with thick glass and a strategically positioned CCTV camera.
C. Windows on the side of the road
Crooks may be attracted to windows that do not face a major street or road since there are no curious eyes from the public. In addition to cameras, keep your windows closed and secured anytime you leave the house as an added layer of security.
D. Garage
Some homeowners may not think to keep an eye on their garage, yet it’s the typical entry point for burglars. Consequently, whether or not your garage includes costly equipment, it is critical to maintain it securely.
A camera positioned in the driveway or garage area is ideal for detecting suspicious activities. Alternatively, you may install the camera inside the garage and aim it such that the light from the opening door illuminates the dark inside.
E. Backyard
Whether it’s a shed full of costly gardening machines or a lawn full of play equipment for the kids, our gardens frequently include numerous expensive objects that burglars find appealing.
Place a few strategically positioned cameras and security lights across the area to make it safe and secure. These items can effectively deter lawbreakers, making them reconsider entering your garden.
F. Indoors
It’s an irrelevant misperception that CCTV cameras are only suitable for outdoor use. Installing a camera on the interior of your home, with the lens aimed at the doors or windows, can capture a criminal entering your home and provide a clear shot of their face for quicker identification.
The main drawback of indoor cameras is that they are not a visual deterrent, and a burglar must first enter your home to observe them.
Ask a security consultant for further information on the ideal placements for home security cameras, and they will be able to help.
2. Place Or Mount The Camera
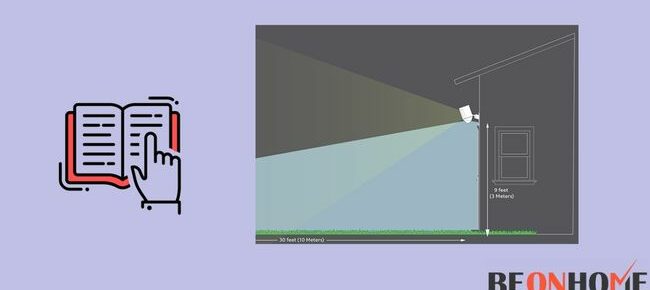
Install cameras at a distance of 8 to 10 ft from the ground. This height is low enough to catch delicate details while yet being high enough to keep thieves and vandals at bay.
Cameras should not be pointed directly toward the sun. Bright light in your film generates glare and excessive contrast, making it challenging to identify what’s happening. Consider the movement of the sun and point the camera at indirect light.
Visible security cameras can discourage burglars and be targets for theft and damage. A few property holders like to put a fake imitation camera and back it up with a veritable one that is more covered up. Others add substantial equipment or packaging to make the camera harder to hurt. Choose whether the camera should be visible or concealed.
The camera ought to be shielded from the components. Top open-air surveillance cameras are weatherproof and waterproof to changing degrees, yet they are not all made equivalent.
Choose a camera rated for your climate and mount it beneath eaves or in a semi-protected location if possible.
3. Connect Any Necessary Cords And Plug The Camera In
If you don’t need to drill holes in your house—or if you enter—you can hide your security camera’s in with cable raceways and other equipment.
A. Covers for cords
The wiring on your camera may be hidden using cord covers. If you’re covering your cables along the side of your house, these low-cost coverings, also known as cable raceways, may be readily attached on top of them. Most covers are white; however, you may paint them to match the surface.
B. Soffit
The soffit shields your overhang and loft region from the components by covering the underside of your rooftop. The cord for your camera can be hidden along the soffit.
Wire-free cameras for the roof soffit– You may also get wireless security cameras like the Blink XT2 that run on batteries. Many of the same functions as wireless IP cameras, such as two-way audio and night vision, are available on this camera.
4. Connect Your Camera To Wi-Fi Or An NVR
The installation method is more complicated if you have a CCTV camera. Since CCTV surveillance cameras connect to an organization video recorder (NVR) through a Control over Ethernet (PoE) link, you need to string the line from the camera to your beneficiary.
That suggests that assuming your collector is in your cellar office and your camera is at the front entry. The arrangement may be somewhat precarious. You’ll likely need to run the wire through your cellar. Just make sure, you pick a good front door camera with decent live view.
Introducing a CCTV camera is practically identical to introducing IP cameras. Yet, you’ll require a couple of more excellent hardware.
How to use a PoE cable to set up a security camera?

- Pick an area for your camera.
- Find an appropriate area on the divider.
- Mark the border of your camera, the area of the screws, and the focal point where your camera will be introduced utilizing a pencil.
- A few cameras have a drilling layout to assist you with arranging where you need to bore.
- Make a note of where you are taking your camera. Create a giant hole using a spade bit to pass your PoE cable through.
- Drill into the marks using a spade bit.
1. Run the cabling through the dividers of your home.
The PoE wire should be taken care of through the dividers of your roof or storm cellar, then, at that point, strung into the room containing your beneficiary.
The fish tape is used here because it’s flexible and can pass through long, narrow apertures. You may need to utilize extension cables depending on your home’s exterior. You can see the cables running through your walls.
2. Put your camera in place.
After you’ve completed the process of running wires, interface the ethernet link to your camera, mount it, and afterward associate the opposite finish to your NVR.
How To Install Swann Security Camera Wiring?

There are a few additional and unique concerns when installing security cameras outside:
- Backlighting and lens flare should be avoided. Backlighting happens when a strong light leaks through the film, producing an extremely pale, nearly white picture.
- Any brilliant light, for example, the sun, a security light, or a streetlamp, can cause backdrop illumination.
- Lens flare can be caused by reflections from the sun or other lights, resulting in circles or dots on your surveillance film. To avoid bad security footage, ensure the security camera is facing away from direct sunlight.
- Place the surveillance camera someplace far off. Make sure the cameras are in a difficult-to-reach location. You don’t intruders to access the camera since they might quickly break it easily.
- However, don’t install the camera too high because this will make it difficult to identify persons recorded on video.
Check the strength of your Wi-Fi connection.
The further the camera is from your network, the more difficult it is to acquire a good connection. As a result, at each camera site, verify your signal strength.
Install a Wi-Fi extension if your signal is poor or fading out, or try these ways to improve your Wi-Fi connection. This only applies to cameras that are linked to the internet through Wi-Fi.
Check whether your county, state, or nation has any monitoring laws. Although most states in the United States do not have particular surveillance regulations, ensure security cameras are not pointed into a neighbor’s residence.
Install Hardwired Security Camera Wiring:
Depending on where you plan to put your cameras, you may require different tools than I do. For instance, I want to install the camera on a wooden surface, drywall, or metal, so a standard power drill and some fundamental boring tools will get the job done.
However, if you want to bore into a block or other stonework, you’ll require a mallet drill and workmanship bores.
Regardless, start by assigning an opening for the cameras to go through and openings for the camera’s setting screws. A few bundles will incorporate a layout sticker, making the work much more straightforward.
If yours doesn’t accompany them, place the camera against the divider or roof where you need it and press the screen button.
Drill pilot openings where the mounting screws will go utilizing a power drill and a boring tool. Then, at that point, in the center, drill the bigger opening through which the link will pass.
You’ll require a spade bit for the bigger opening, even though you could observe a standard bore that is adequately large.
Install Wireless Security Camera System Wiring At Home:
Wireless security cameras rely on Wi-Fi signals to transmit data but require a power cable to operate. they’re easy to install, moreover, Wirelesss cameras are best for outdoor safety purposes. The setup instructions below show you the installation method for wireless security cameras.
Stage 1: Spot the camera in closeness to an electrical plug.
You can run the power line for your remote surveillance cameras on the off chance that the electrical plug is somewhat further away.
Stage 2: Associate the camera with a power source.
For the principal arrangement, you associate the camera to the switch through an organization wire. From that point forward, you might turn off the organization link.
Stage 3: On your iPhone or Android telephone, download and run the Relink Application.
The camera will quickly connect to your cell phone whenever you associate with the LAN. When in WAN, filter the QR code or information on the cameras to see the live transmission.
Install Outdoor Security Camera Wiring:
Stage 1: Set out the surveillance camera wiring. To make the internment task simpler, track down, to some degree, a short and direct method for covering your channels.
Stage 2: Use wire watches, PVC channels, or metal conductors to shield the home surveillance camera links from altering by individuals and creatures like squirrels, birds, and others.
Stage 3: Assuming you want to drive your PoE surveillance camera outside, all you want is a Felines/6 link since PoE cabling can convey the two information and capacity to your cameras.
Regarding remote surveillance cameras, you should simply run links to the power source that provisions power to the cameras. (The exit ought to be watertight and impervious to the components.)
Stage 4: Draw a circle around where you need to cut the opening.
Stage 5: Drill an opening in your home to run surveillance camera wiring. When the opening in the divider has been cut, utilize a boring tool to make an opening so that links might be taken care of through it. While drilling enormous openings, utilize a right-point drill with opening saw bits.
Keep the openings on the studs focused. It’s simpler to bore an opening in the divider than to make an opening in the floor.
You should simply bore gradually and delicately without coming down on the boring apparatus. At the point when you feel the drill entering the divider, stop.
How Do You Run Power Wires For A Security Camera?
Plan where the optimum placement for running cables to link the camera to the Network Video Recorder (NVR), DVR box, and power supply. (Power over Ethernet (PoE) is used for camera cabling by NVRs and routers.). Just make sure the camera you’re going to buy is best for PoE.
Measure the length of the cables and wires to determine how long they should be, and drill with enough room for several wires and cables to pass through.
Before installing the components, lay out the layout and test all equipment and cameras.
Make sure each camera has a clear line of sight, and choose a site at least 10 feet high to protect it from the elements and vandals. Don’t install cameras that are difficult to maintain and clean, especially if they have backup batteries.
Turn off the building’s supply when you’re ready to install wired cameras.
Remember to name ports and the associated cameras after connecting the input cables for numerous cameras (to the NVR/DVR box).
Why Is Wiring Important?
Electrical cables are the most fundamental component of every electrical system. Electrical wires are a collection of wires used to distribute enormous amounts of power.
The flexibility given by the cable under the sheath is one of the key differences between cables and normal wires.
Cables are used to manage a big portion of the electrical panel at your house or anywhere else, making them extremely important to us all. Several varieties of cables are available in the market, each with its specialty and requirements.
The technical specification of cables divides them into groups, such as LAN cables and CCTV cables, indicating their intended application.
Because cables are the primary means of transporting energy throughout your home, you must verify that all electrical lines are safe.
Electrical wires are made to carry a constant electric current that should not cause a fire in the event of an accident or a short circuit.
The breakdown of electrical cables is the cause of the majority of electrical failures in India. The importance of this significant resource is frequently overlooked.
A great power cable should operate better in the event of electrical failures, overloading, and rapid electrical fluctuations and be fire-resistant in the event of danger.
If you’re considering updating your home or just want to learn more about them, here are four things you should know about electrical wires.
FAQ
How Much Does It Cost To Install?
The price of a security camera varies depending on its grade and kind. In India, the normal expense of a CCTV establishment is Rs 12000. Depending on your demands and budget, a CCTV installation might cost anywhere from Rs 7500 and Rs 25,000, depending on the type, manufacturer, quality, and amount of CCTV cameras used. Cameras are used in the installations.
Final Talk
Do-It-Yourself surveillance cameras are frequently easy to set up, whether introducing a night vision-empowered camera for your carport or an inside camera as a feature of your security alert framework.
A surveillance camera, once introduced, might be a great technique to watch out for your family and any unwanted visitors. As you can see from this post on how to install CCTV, there is a lot to it, and you will need some DIY knowledge to complete the installation.


Leave a Reply