If you find it difficult to install a garage door then we have a perfect solution for you in this article. You can follow the step-by-step guide to ease your work and complete it faster.
Method To Install Garage Door Insulation Install:
Quick Navigation
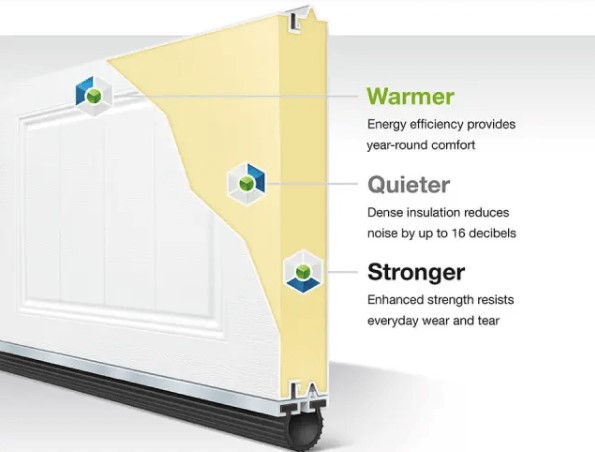
Apart from following our guide on how to install garage door insulation, one is advised to go through all the manufacturer’s instructions written on the equipment you’re gonna use for your installation. Thus, Don’t miss out on the instructions. They are too Important.
Here are the steps :
1. Choosing The Foam Board /Reflective Panelling
The first thing that we need is the perfect insulation board to protect your garage, you can either choose from foam board or Reflective paneling.
These foam boards and reflective paneling are at less cost and can be used for areas with less weather temperature, but one must keep in mind that if they are living in the extreme weather temperature vicinity, then they should choose something thicker than foam board and reflective paneling.
- Foam boards can be a better option for high-temperature areas, however, reflective paneling is effective for any other area.
- Foam boards are harder and thicker than reflective paneling, They both are cost-effective and can be found in any hardware shop near your house.
2. Garage Insulation Kit
Once you have purchased the foam boards or reflective paneling for your garage, the first thing that you need to get is the garage insulation kit, it is essential for people who live in extremely hot or cold weather to get the kit. if you just want to temporarily insulate your garage you can use a thick spray form insulation.
Insulation kit can be effective as it comes with a personal guide which will further direct us to get the job done, it can also be helpful when it comes to getting to know the tools we are using.
- The garage kit has fiber batting with a high R-value which will then be helpful for those with extreme weather conditions.
- It comes with a guide to assist you with your insulation
- It can be effective in your overall installation.
3. Use the Foil Side For Better Insulation Results
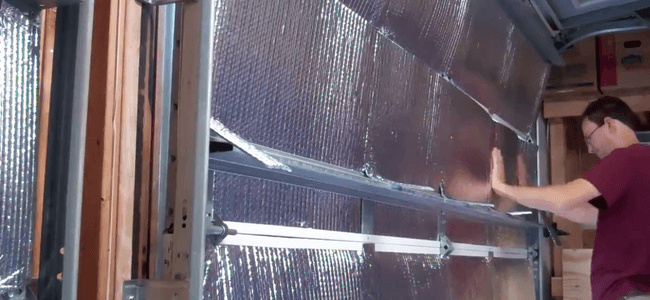
Some insulation boards or paneling can come with the foil only on one side, so it becomes necessary for you to choose the side as per your requirement.
Foil plays an important role in your overall experience with the insulation, foil face side can manage your inner garage temperatures,
- If you want to keep your garage cooler then it is advised to set the foil side facing the door.
- And if you want to keep your garage a little hot then it is advised to keep the foil side facing your garage.
- It all depends on how you use your foil side.
4. Cleanliness
Well, cleaning plays a very important role in your overall insulation, this it becomes necessary to clean your garage door, there are fair chances the doors must have dirt, grime, or grease attached to it, Thus it becomes vital for you to clean your doors before the whole insulation.
- Use cleaning spray or dry cloth to rip off all the dirt from the doors
- You can also use the water pressure to do the same task
5. Measure Door
Once you are done cleaning then it becomes important for you to check all the doors, if there are some cracks or broken sides, then you must correct that on the first basis, if not then you can move forward with your measure.
To get the better insulation job done, you must first measure your door properly, it can help you with the insulation kit.
- Use tapes to measure your doors, take a better note of all the dimensions of your doors.
- This measurement will help to buy your installation kit for the insulation of your garage.
- Make sure the measurement are correct
6) Start Installing Retaining Pins Doors
Once you’ve purchased your installation kit as per your requirement, one should keep in mind the measurements of the doors while purchasing the kit because it determines how many retaining pins are required for your garage insulation.
The local shopkeeper might help with that, but you should get the measurements for that, for example,
If you have a massive garage, then you may need to buy a kit that comes with more retaining pins, or if not then get the one that comes with less,
This might help you to purchase the best insulation kit for your door.
- After that, the first step is to fix the retaining pins all over your doors in the correct dimensions, for each panel, use one retaining pin which comes with long plastic or metal spikes on a wide and flat base.
- If you don’t want to use the retaining pins, then you can surely move up with sheets of batting insulation as a mentor to wipe your door up into various categories.
7) Cut Batting And Cut As Per Door Panels
Once you get the insulation kit, You should start with the cutting of your batting, The battings should be cut as per your door panels size, Thus, to get the perfect fit you must cut the batting perfectly.
You do not need batting pins if your doors are without panels, because once you attach the retaining pins, you no longer need to cut batting, as it comes with the perfect size with the kit.
8. Pressing on batting
Once you are down with the citing your battings, what you need to do next is to press the cut parts on the retaining pins that you’ve attached over your door panels. It is very essential to use strong adhesive while Pressing the insulation into the area only when your doors have panel railings.
You can do that by dropping some of your chosen adhesives around on the non-foiled side of your insulation.
Make of roughly 1 Make2.5 I’m from the horizons and 3 inches (7.6 cm) apart. Make sure not to stroke the adhesive, clutch the thing, or panel into position on the gate.
While placing the batting on the panels, one should keep in mind that your batting is covered with the foil on one side, if not then it would get difficult for you to maintain the garage’s temperatures.
- Make sure you are placing it on the centre not on the side
- Start by tucking the edges on the metal railings.
- Check the foil size for a better presentation.
- If you have no metal railings, then you can place them directly on the retaining pin.
- Make sure that it is fully centred and shaped.
- Make the cits to recognize it.
9. Sign Over Retaining Pins
Utilize the retaining pin to realize underneath the batting and discover the retaining pin jutting out. Press below on the batting, use the pin, and borrow a craft blade to curtail through the batting.
Make sure to make 2 tiny cuts across the top of the buckle, approximately 1 inch (2.5 cm) in size to establish a small hybrid that the nail can stick through.
10. Secure Batting On the Fastener
It is essential to use a fastener, The brooches should arrive with the insulation equipment and will be metal or plastic sleeves that tumble over the maintaining pins to maintain the insulation in the spot.
- Press a hanger onto each of the pins, push below, and wait until it clicks into the spot
- Numerous pieces of equipment will retain several conserving pins and fasteners.
- Check the factory’s instructions for your particular garage gate insulation equipment for guidance on how to connect your rods.
11. Use Aluminum To Cover Loose End
This can happen while you are doing your work, you might tend to lose a few spots during the insulation, it is advised to use aluminum foil to cover the loose ends if any arrive so.
An aluminum foil tape will clasp the batting area and assist insulate the rifts between each portion of the batting. It should be accessible at your regional hardware shop or online on the internet.
Why Install It?
Following the given steps carefully can get you your favorite type of garage door insulation without having to spend much on outdoor services.
Many agencies charge hefty amounts to get the job done, however, with the help of this guide you can get it done all by yourself.
If we talk about the advantages of garage door insulation at home. The first thing that should come to your mind is that it will save up energy bills.
Having garage door insulation will maintain the items from weather conditions, which will then reduce the annoying noise coming from streets and neighbors.
If you’re an automobile enthusiast then this guide will help you keep your vehicles safe and sound, But for that learn how to install garage don’t insulation at home.
Is Insulating My Garage Keep It Warmer?
Some insulation boards or paneling can come with foil only on one side, so it becomes necessary for you to choose the side as per your requirement. Foil plays an important role in your overall experience with the insulation, foil face side can manage your inner garage temperatures. If you want to keep your garage a little hot then it is advised to keep the foil side facing your garage. Moreover, you can use a high-quality garage air compressor to keep cold air out.
Recommended Garage Door Insulation Kit
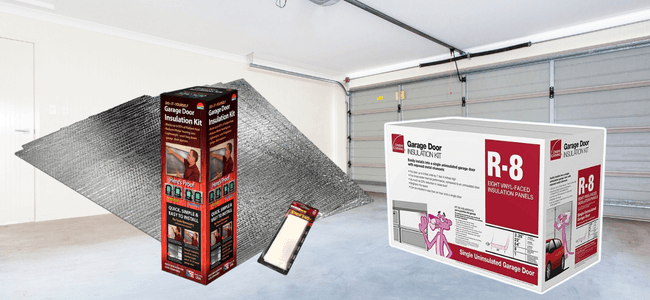
1. Reach Barrier(Tm) Reflective Insulation
- Panels Include 2 Layers Of 5/32-Inch Barrier Bubble Laminated Between 2 Layers Of Reflective Polyethylene, Which Will Help Deliver More Consistent R Values.
- Exceeds New Fire Codes And Requires No Maintenance Easy To Use
- Install Pre-Cut Panels Require No Protective Clothing Or Special Tools When Installing
2.
- Installation in 3 easy steps
- Installation does not require tapes, glues, or pins
- Fits most standard pan style 8-foot and 9-foot garage doors
3.
- Establishes an air compartment to attain an R8 value insulation 8ft and 9ft 4 Panels Doors
- Recoups heating costs in winter lessens heat casualty through the garage.
How To Install Owens Corning Garage Door Insulation Kit?
Once you have purchased the foam boards or reflective paneling for your garage, you for Owens corning garage door insulation kit
The Garage Door Insulation Kit is designed for use on uninsulated metal garage doors. Each of the 8 panels in the kit is designed to cover up to a 22” by 54” opening and fit neatly into the exposed channel of the door.
As a result of its unique design and construction and the nature of the base material, the Garage Door Insulation Kit offers some attractive benefits:
- 5 times the better thermal performance, compared to an uninsulated door
- As much as 20% reduction in perceived noise level**
- Brightens the space
- Installs in less than 1 hour (up to 9’ door)
- Flexible material resists denting
- Big performance in a small package – 12”x16”x 24”
Installation
The Garage Door Insulation Kit can be installed in less than 1 hour. The only tools needed to complete the installation are a tape measure, utility knife, straight edge, and a marker. Simply measure mark, trim and install.
Final Talk
The installation charges of garage charges are pretty big which can even cost half of your salary, but if you’ve installed your house doors, or have done DIYs then with the help of this guide you can get your installation done with no cost of service.





Leave a Reply