
Although WPS (WiFi Protected Setup) is a great tool that makes it easier to connect with wireless networks from your device. But the problem is that it is relatively easy to hack. So it is better to disable it. If you don’t know how to do it, here are some steps to disable WPS ATT Router.
Steps To Disable WPS ATT Router:
Since AT&T partners with various manufacturers, the router you provide could be from a different brand. This guide will discuss disabling WPS on AT&T and other manufacturers’ routers.
Here is how you can disable WPS on your AT&T router:
1. Go To Home Network > WiFi.
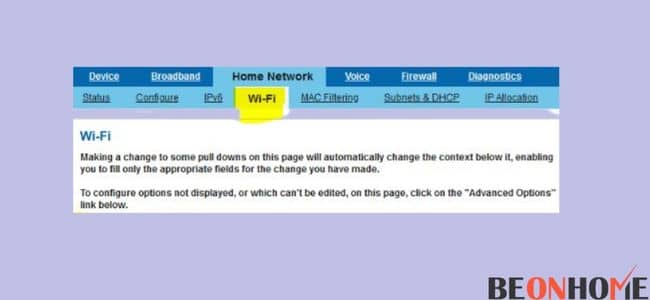
First, go to your home network and tap on the WiFi option. You can do this with the help of the app provided by the internet provider. This app is used to manage your WiFi network.
2. Choose Advanced Options.
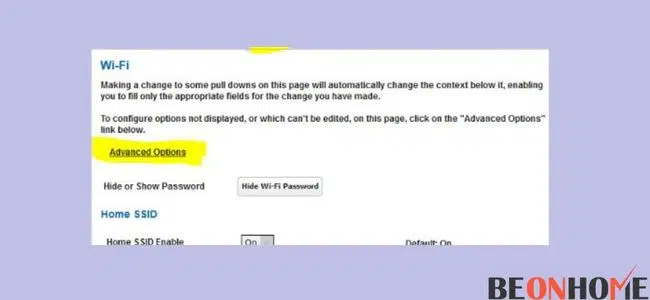
After selecting the WiFi option, locate the advanced options on your app. Once you have located it, tap on it to proceed to the next step.
3. Look For The Drop-Down Menu Labeled WiFi Protected Setup.
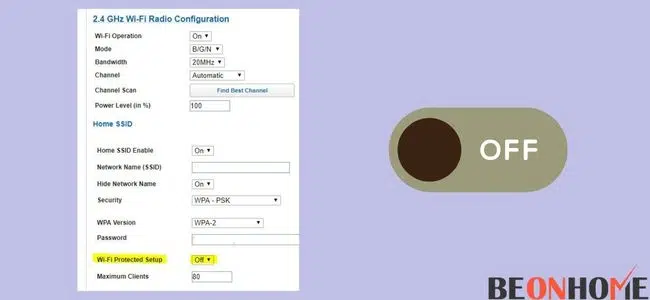
After you have tapped on the advanced options, you will have to select WiFi Protected Setup from the drop-down menu. It should be relatively easy to find in the app
4. Set It To “Off” And Save Changes.
After selecting the WiFi Protected Setup, you will see a drop-down menu. There choose “Off” to disable the WPS. Now press the save button; this will complete the whole process.
How To disable WPS for different manufacturers?
We have already covered how you can disable WPS for your AT&T router, so we will go through how you can disable WPS for other manufacturers.
- Apple Airport: You don’t have to worry about disabling WPS on your Apple Airport device since there is no WPS available for Apple Airport devices.
- ASUS: If you own an ASUS router, enter 192.1681.1 in your browser’s address bar. Log in using the username and password; usually, “admin” is the default username and password. Now locate the advanced settings and click on them. You must choose the WPS tab and turn off the “enable WPS” toggle.
- Belkin: If you own a Belkin router, you must enter 192.168.2.1 or http://router in your browser’s address bar. You will find the login option; click on it to open the login form. Enter your username and leave the password blank as that is the default. Click on submit to login into your account. On the left side of the screen, you will find the wireless option; under it, you will find the WiFi Protected Setup. You will get a drop-down menu, then click on “disable” and then “save changes” to complete the process.
- Buffalo: You don’t have to worry about WPS as they are not affected by it.
- Cisco Systems: Just like before, you will have to enter your IP address and then login into your account. The IP address may vary depending on the model. Check the instruction paperwork or the sticker which should be attached to your router. After you are logged in, repeat the same process as before. Go to Wireless > WiFi Protected Setup and select the “Off” option to disable the WPS. After this, click on the “save” button to apply these settings.
- D-link: If you own a D-link router, enter 192.168.1.1 on your browser’s address bar. Just like the steps above, log in using the default username, which is “admin,” and for the password, you can leave that empty. After this, click on the “Setup” tab and then uncheck the box next to “enable WiFi Protected Setup.” Click on the save setting option to complete the whole process.
- Linksys: If you own a Linksys router, then you cannot change the WPS settings, but also don’t have to worry about hacking attacks as Linksys prevents attacks on your PIN.
- Netgear: If you own a Netgear router, you have to enter www.routerlogin.net on your browser’s address bar. From there, log in using the default username and password, “admin” and “password,” respectively. There locate the advanced settings and click on them; after that, choose the wireless settings. You will find “Disable Router’s Pin” under the WPS settings. Now click “Apply” to complete disabling the WPS.
- Trendnet: Just like before, enter the IP address which is 192.168.10.1. Then log in using the default username and password, “admin.” Under the Wireless option, select the WPS option, and from there, select the “Disable” option from the drop-down menu. Click on “Apply” to complete disabling the WPS.
- ZyXel: For ZyXel routers, enter the IP address 192.168.1.1 and login using the default username and password, which is “admin” and “1234,” respectively. Now under the Wireless menu, you will find the option for WPS. Click on the WPS option and then click on the blue box to disable the WPS.
- Tp-Link: If you own a Tp-Link router, then you will have to enter the IP address, which could be either 192.168.0.1 or 192.168.1.1, or 192.168.10.1. You can confirm it by checking the details on your particular router. Now login using the default username and password, which should be “admin” and “password,” respectively. After this, click on the “Interface Setup” option and then click on the “Wireless” submenu. Now locate the “Broadcast SSID” option, and under it, you will find the “Use WPS” option. Click on “No” to disable the WPS.
Final Talk
WPS might have its uses, but it is also easy to target for hacking attacks, so it is better to keep it turned off. If you need to connect devices, you can turn them on by following the process above. To keep your home network, it is advisable to keep it turned off.


Leave a Reply