Additional menu
Smart Home | Security | Surveillance
SMART HOME | SECURITY | SURVEILLANCE
Our experts have done the research to find out the best Home Surveillance, Security, smart home devices, automation, remote control, lighting control products for you.We do in-depth research on the products so that you don’t have to.After doing hundreds of hours researching and testing here’s our advice on safety gear ranging from home safe,security alarm,smart detectors with trustworthy recommendations that can keep your home and dearone’s protected
All You Need To Know Make Your Home A Better Place

How to
In-detail instructions and tutorials for your home improvement
DIY
DIY projects to improve your home and life style
Education
Our expert share their knowledge on various topics to educate you.

Reviews
In-depth review of the product by carrying out tests and gathering information by getting a fast hand experience of it.

Which to choose
Buying guide which will help you make an informed decision while choosing a product.

Comparison
In-detail comparisons to help you choose which is more suitable product for your need.
Research Areas
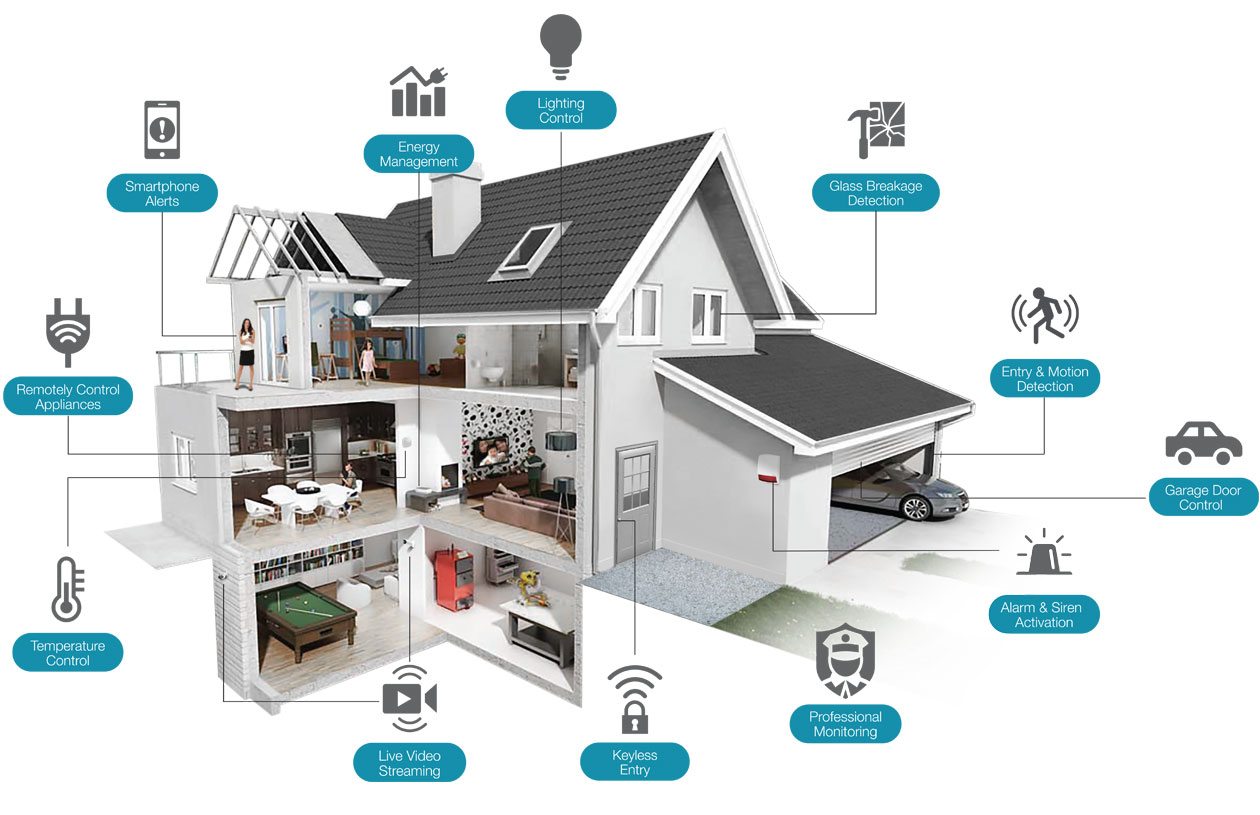
Smart Home
- 1.What Are The Elements Of A Home Automation System?
- 2.15 Devices To Make Your House A Smart Home
- 3.Which Devices Are Commonly Controlled In A Smart Home?
- 4.Benefits Of Home Automation
- 5.Do I Have To Make My Whole House Smart?
Safety
- 1.Safety Checklist : Home ,Kitchen, Pool,Seniors, Fall, Fire
- 2.Emergency Kits 101: How To Be Prepared For Anything
- 3.402-935-7733 What Is This Number ?Paypal Or Scam
- 4.Ultimate Guide To Security Equipment
- 5.How To Burglar Proof Your Windows
Standing Desk
- 1.Standing Desk
- 2.Standing Desk Converters
- 3.Chair & Stools For Standing Desk
- 4.Standing Desk Exercise Equipment
- 5.Oristand-Standing Desk Converter & Sit Stand Workstation
Smart Lock
- 1. How Do Combination Locks Work?
- 2.How To Fix Jammed And Stuck Locks
- 3.Rekeying vs. Replacing Your Locks
- 4.Rim Locks : Everything You Should Know
- 5.Smart Lock For Outdoor Gate
- 6.Best Smart Lock For Garage Door
Smart Cameras
- 1.Differences Between Monitored and Unmonitored Security Systems
- 2. Locations To Install Cameras & Sensors
- 3.DVR Security System
- 4.NVR System
- 5.4K Security Camera System
Smart Wifi System
- 1.Netgear Orbi Vs AmpliFi HD
- 2.Luma Vs Orbi
- 3.Eero Vs Orbi Home Wi-Fi System
- 4.Eero Vs Google Wi-Fi
- 5.Cyborg Unplug
Scanners |Printers
AirBnb
- 1.Smart Lock For Airbnb
- 2.Key Lock Box For Airbnb Self Check-In
- 3.Home Security System For Airbnb
- 4.Smart Home Devices For Airbnb
- 5.Airbnb Security Camera System
Flag Pole
Searching for a product?
If you’re searching for a certain product or want to find the most suitable
for you among all the available products, just start typing, and we’ll do the rest.
Latest Ratings of Products for Your Home

Best Parabolic Listening Device


Subscribe to receive latest tips, guides and tutorials
We won’t rent or sell or spam your email. We promise!