If you own a Nest thermostat, then you know you are lucky during the winter season. The device not only provides you with ample heat but, more importantly, reduces your power bills. However, like all devices, this one too comes with its own niggles, like low battery.
If you are facing this issue, then you will want to know that it is quite simple to fix it. There are a couple of things that you might want to know before you begin. The minimum operating level is 3.6 V, and below that, your thermostat cannot be used. This is how you can fix the Nest thermostat low battery issue.
Method To Fix Nest Thermostat Low Battery
Quick Navigation
The Rh and/or Rc cables power the Nest thermostat batteries straight from the HVAC unit. To finish the circuit, a C-cable, also known as a common cable, is utilized as a neutral.
A constant supply of power is provided via the cables. This keeps the thermostat charged up.
Although if the HVAC unit is turned off for an extended duration of time. The battery’s function is to provide power to the Nest connection.
Particularly when there is no straight power from the HVAC system. This is also beneficial in the event of a power loss. Some ways are mentioned below to resolve this problem.
Step 1: Utilizing the charger connector on the back of the Nest Thermostat to charge it
One might have to personally charge their Nest thermostat. This is done for a variety of causes, including:
It’s been placed in the store for a while.
After an extended period, the HVAC system has been turned off. The Nest device might not turn on or charge again from the main unit.
This is when the battery’s power falls under roughly 3.6 volts. In this situation, we’ll have to charge the batteries.
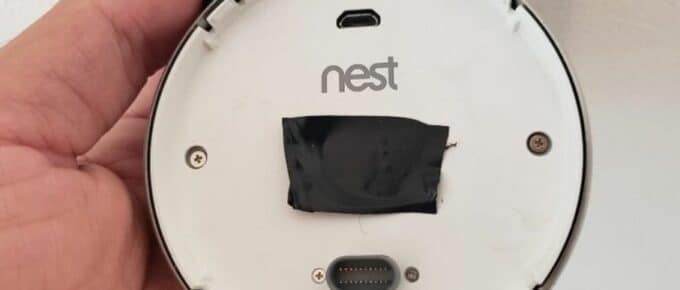
Users can easily charge the batteries. Utilizing the charging connection located on the back. According to the brand, you’ll require a mobile charger and a micro or small USB connector. Disconnect the thermostat from the main station.
Insert the mobile charger into a wall outlet. Attach the cord to the charger and the thermostat’s micro-USB connector on the back. The device is charged when the red led at the tip of the device finishes flashing.
It should require anywhere from Thirty mins to 2 hrs to complete. When you have an outdated model without a USB cable. You’ll have to charge the batteries again in a specialized rechargeable battery.
Step 2: Insert a C wire, often known as a common cable
When individuals have confirmed that the battery is in an unacceptable condition then users have to figure out exactly why it’s not charging properly and rectify it.
The heat and cooling controller circuits usually provide sufficient electricity for the thermostat. When that isn’t the situation, a C cable, commonly referred to as a Common cord, could be attached. One might possibly have an extra cord lying around that user could use for the setup.
Or else, you’ll have to connect the furnace to the Nest thermostat with a wire.Cut the power of the furnace for security. Take the Nest thermostat out of the main unit and set it aside.
Look for a C connection. However, if there is a cord attached already then take a record of the color.
Examine the furnace’s wiring next. Ensure that a similar color cord is used to attach the Nest C connecter.
That is also attached to the C terminal to the furnace. A fresh cable would have to be put across the thermostat and the furnace when there is no wire attached. Attach the C connection on the Nest to the C terminal with the furnace.
By using a fresh wire. Again, place the Nest with the main unit. Turn on the furnace and check to see if it’s functioning accurately.
Step 3: Make use of a standard cable transformer
There is an alternative way when users detach the Nest from the main unit. Thus, discover no C cable and don’t wish to attach the additional wire.
The thermostat’s main issue is that it does not have a stable power source. With a simple 24Vac converter, one could give a steady power source to the thermostat.
The process is easy to follow:
- To ensure security, cut the power of the furnace.
- The Nest thermostat should be taken out from the main unit.
- Put the transformer wires through the middle hole and at the back of the main unit.
- When there is a wire attached to the Rh connection, unplug it and secure it.
- One of the transformer wires should be attached to the Rh connection.
- The second transformer wire should be linked to the C connection.
- Connect the transformer to a power source and turn it on.
- Again, place the thermostat and do testing.
As the thermostat begins to move through the process, the warning led should begin to blink.
After you’ve double-checked that everything is operating. You’ll probably have to fix up the transformer wires.
You have the option of putting them beneath the wall. Not only that one can shield them with an electrical channel.
Step 4: If you don’t own a C wire, this is a good alternative
If there is no common cable attached to the Nest main unit, there could be a simpler option. A fan controlling wire is frequently needed by outdated HVAC units which are roughly Twenty years old or older.
One could benefit from the fact that new devices do not require it. We may attach the fan wire to the common cable connection.
Moreover, create a charging circuit for the batteries using the fan wire. The C connection cable should be blue in many circumstances. In fact, though, it makes no difference.
Each of the wires connecting the Nest and the furnace is pure copper. Further, the colors are simply for recognition.
- Turn off the power of the furnace for security reasons.
- Disconnect the Nest thermostat from the main unit.
- Locate the G connection.
- The G cable, which operates the fan, is no longer required in current devices.
- Change the G connection to the C connection on the cord.
- Change the connection from the G terminal to the C terminal at the furnace.
- Again, place the thermostat in the Nest.
- Turn on the power of the furnace.
- Verify that everything is in functioning properly.
Step 5: Reboot and again start the device
A few Nest thermostats had a software fault that forced the batteries to halt charging. Moreover, the system ultimately stops answering.
While Nest has already been exploring a remedy. There is a workaround if the thermostat is experiencing this issue.
One must manually restart their Nest thermostat as described in the following:
- Take out the thermostat batteries from the main unit, charge them again, and then replace them. Refer to the process outlined previously.
- By clicking the ring on the Nest thermostat, one could access the main menu.
- By twisting the ring and choosing “Settings.”
- By twisting the ring and choosing “Reset,” one could reset the gadget.
- The “Restart” option is then available.
Users have an option here. Alternatively, one could choose to restart the Nest which would save all of the information. Alternatively, one could choose hard reset which would erase everything and reset the thermostat.
Will Nest Thermostat Work If Battery Is Low?
Despite the fact that the Nest thermostat isn’t really battery-powered. It does have a lithium-ion battery that serves as a backup in the event of a power interruption. As a consequence, this would operate for about 2 to 3 hours. Even
without main power energy before closing down altogether. When you’re using the Nest during a power failure, it would operate.
However, if the home’s heating or cooling is electrical then the Nest would not be ready to heat or cool the home properly till the electricity is returned.
The message “Battery Low” warns that the Nest thermostat’s battery is getting lower. A flashing red light would also be visible on the Nest. This could cause the thermostat to behave strangely. Such as:
It might not be capable to request heating or cooling from the HVAC unit. The Nest thermostat’s connectivity to the Wi-Fi can be affected. The Nest thermostat’s screen may stop functioning or even turn unresponsive.
What Happens If Nest Thermostat Battery Dies?
The main purpose of the batteries in the thermostat is to preserve any pre-set data. In the case of a brief power interruption. Allowing the heating/cooling unit to keep operating normally.
You’ll notice a dark monitor display when low batteries die. The thermostat would quit operating.
Moreover, the heating and cooling equipment would quit functioning. The heating and cooling technology are unable to answer temp directives. That does not exist.
Final Talk
So, hope that now users understand that they don’t need to be concerned. If the Nest thermostat’s battery is down. With the procedures listed above, one could simply resolve the problem. When power failures occur frequently in the home for several hrs. It may be profitable to spend on a UPS or generator. The batteries in the Nest thermostat are only for storage purposes. Thus, they should not be used for extended periods of time or for excessive use.


Leave a Reply